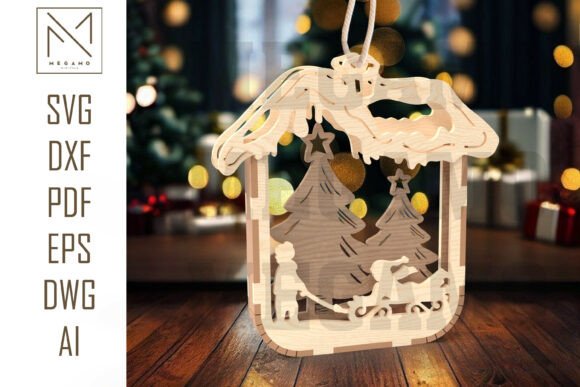
Snowman Village Ornament SVG: Creating Dimensional Holiday Magic Without the Frustration
There is a distinct satisfaction in holding a finished laser-cut project that feels substantial and intricate. When you add a touch of winter magic to your Christmas tree with this layered 3D ornament SVG design, you are not just hanging a decoration; you are displaying a piece of engineering art. Each piece features a detailed forest and holiday scene, creating a stunning dimensional effect when cut and assembled from wood or acrylic. However, the gap between downloading a file and holding a flawless ornament is often wider than beginners anticipate. Many crafters rush into production only to find their layers do not align, their edges are charred, or their assembly takes hours longer than expected. Understanding the nuances of the Snowman Village Ornament SVG can save you time, material, and significant disappointment.
The Misconception of "Ready-to-Cut" Simplicity
One of the most common misunderstandings among new laser cutting enthusiasts is that any SVG file will work perfectly straight out of the download folder. While the included formats such as SVG, DXF, EPS, PDF, and DWG are industry standards, they are not universal in their behavior across different software ecosystems. A file that looks perfect in Adobe Illustrator may have open paths or redundant nodes when opened in LightBurn or Glowforge’s native interface. This discrepancy often leads to the laser head making unnecessary movements, burning areas that should remain clean, or failing to cut through completely because the software interpreted two overlapping lines as a single thick line rather than two separate cuts.
To avoid this, always inspect your vectors before sending them to the machine. Check for closed paths and ensure that no duplicate lines exist on top of one another. For the Snowman Village design, which relies on precise layering, even a millimeter of deviation caused by poor vector hygiene can ruin the 3D effect. Take the extra five minutes to simplify paths and verify cut orders. This small step ensures that your recommended material, whether it is 3mm plywood or MDF, is used efficiently without waste.
Material Selection and Thickness Tolerances
Another frequent error involves material selection. The design is optimized for 3mm plywood or MDF, but not all 3mm materials are created equal. Plywood from one supplier might be exactly 3.0mm, while another batch measures 3.2mm or even 2.8mm. In a layered ornament, these fractions of a millimeter matter. If the material is too thick, the tabs and slots designed for assembly will be too tight, leading to cracked wood during assembly. If it is too thin, the ornament will feel flimsy, and the layers may shift, breaking the illusion of depth.
Before cutting your entire sheet, perform a test cut on a scrap piece of your specific material. Measure the actual thickness with digital calipers. If there is a variance, adjust your design slightly in your vector software. You may need to widen slots by 0.1mm or 0.2mm to accommodate thicker plywood. This proactive approach prevents the frustration of forcing pieces together and snapping delicate details like the tiny branches or snowman features in the forest scene. Remember, high-quality home décor requires precision, and precision starts with knowing your material.
Laser Settings: Power, Speed, and Focus
Many users assume that default settings provided by machine manufacturers are sufficient for intricate designs. This is rarely true for detailed work like the Snowman Village Ornament. Using too much power can result in excessive charring, which obscures the fine details of the forest background. Conversely, too little power may leave uncut bridges that require tedious manual cleanup, risking damage to the ornament during removal.
For machines like xTool, Glowforge, and others using LightBurn, it is crucial to create a material profile specific to your batch of wood. Start with a focus test to ensure the lens is at the optimal distance. Then, run a power-speed grid test. Look for the setting that provides a clean cut with minimal flame marks. Since this design is intended for visible display, edge quality is paramount. If you notice heavy soot, consider using masking tape on the wood surface before cutting. This simple trick protects the wood from smoke residue, leaving you with a crisp, clean ornament that requires little to no post-processing sanding.
Assembly Techniques for a Professional Finish
Even with perfect cuts, poor assembly can undermine the final product. A common mistake is rushing the gluing process. When assembling the multiple layers of the Snowman Village, alignment is key. If you apply glue and immediately press the layers together without checking alignment, you may find that the snowman is off-center or the trees do not line up with the background forest. Once the glue sets, correcting this is nearly impossible without damaging the piece.
Use a dry-fit method first. Assemble the entire ornament without glue to ensure all pieces fit snugly. Identify any tight spots and sand them gently if needed. When you are ready to glue, use a toothpick or a fine-tip applicator to apply small amounts of wood glue to the contact points. Avoid using excessive adhesive, which can squeeze out and create messy blobs that are difficult to remove from intricate cutouts. Clamp the layers lightly or use heavy books to apply even pressure while the glue dries. This patience ensures a sturdy, professional-looking ornament that can withstand being hung on a tree year after year.
Maximizing Value for Creators and Entrepreneurs
For small business owners and freelancers, this design offers more than just personal enjoyment. It is a viable product for holiday markets. However, selling handmade items requires consistency. Do not rely on a single successful test cut. Establish a repeatable workflow. Document your settings, material sources, and assembly times. This data allows you to price your products accurately, accounting for both material costs and labor. Additionally, consider offering customization options, such as adding a name tag layer or painting specific elements, to increase perceived value.
When marketing these ornaments, highlight the craftsmanship involved. Explain the layered 3D aspect and the quality of materials used. Customers appreciate knowing that an item is not mass-produced but carefully crafted. Use high-quality photos that show the depth and detail of the forest scene. Good lighting can emphasize the shadows between layers, showcasing the dimensional effect that makes this SVG design stand out from flat, printed decorations.
Final Checks Before You Cut
Before you commit to cutting your final piece, take a moment to review your setup. Ensure your laser bed is clean and level. Verify that your air assist is functioning to help blow away debris and reduce flaming. Double-check that your design is positioned correctly on the material to maximize yield and minimize waste. By treating each step with care and attention to detail, you transform a digital file into a tangible piece of winter magic. The Snowman Village Ornament SVG is a tool for creativity, but its success depends on the skill and diligence of the creator. Avoid the common pitfalls, respect the materials, and enjoy the process of bringing a festive scene to life.