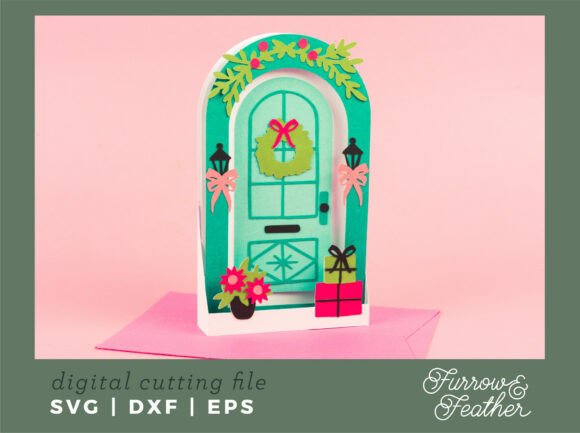
Mastering the Christmas Door Card: A Practical Guide to 3D SVG Crafting
Holiday crafting often falls into two camps: the beautifully intricate projects that look stunning but take weeks to complete, and the quick, mass-produced cards that lack personal touch. The Christmas Door Card - Christmas SVG bridges this gap perfectly. It offers the visual impact of a complex 3D structure while remaining accessible enough for beginners to complete in an afternoon. This design features a festive holiday door, complete with a wreath on the front, gifts tucked to the side, and delicate poinsettia flowers. However, achieving a professional result requires more than just hitting "cut" on your machine. Many crafters overlook critical details in file preparation and assembly, leading to fragile cards or misaligned layers.
Understanding the Design Mechanics
Before diving into the cutting process, it is essential to understand what makes this specific design unique. Unlike traditional flat cards, this is a dimensional papercraft project. When folded out and standing up, the card measures approximately 7 inches tall, 4 inches wide, and about 1 inch deep. This depth creates a shadow-box effect that draws the eye. Yet, when folded flat, it compresses to roughly 7 inches tall and 5 inches wide, allowing it to fit perfectly in a standard 5x7” envelope. This dual nature—structural integrity when displayed and mailability when stored—is the primary selling point. Ignoring the engineering behind this fold mechanism is the first common mistake makers encounter.
Common Pitfalls in Material Selection
One of the most frequent errors involves choosing the wrong cardstock weight. Because this Christmas Door Card - Christmas SVG relies on structural folds to maintain its 3D shape, using paper that is too thin will result in a card that collapses under its own weight or fails to stand upright. Conversely, using paper that is too thick can make folding the intricate hinge points difficult, leading to cracked fibers and unsightly white lines along the creases.
The Better Approach: Opt for high-quality cardstock between 65lb and 80lb cover weight. This range provides enough rigidity to hold the 1-inch depth of the door frame while remaining flexible enough for clean folds. If you are using textured paper, ensure the texture runs parallel to the fold lines to minimize resistance.
Misunderstanding Layer Alignment and Color Customization
This design allows you to change the color of the front door to match your own aesthetic preferences, which is a fantastic feature for customization. However, many users rush through the layering process. The design includes multiple components: the door frame, the door itself, the wreath, gifts, and poinsettias. A common misunderstanding is treating these as separate, unrelated elements rather than a cohesive unit.
If you do not align the layers precisely before adhering them, the 3D effect is lost. For instance, if the wreath is glued slightly off-center on the door, it disrupts the visual balance. Furthermore, when adding your own sentiment, placement matters. Placing text too close to the fold lines can make it unreadable when the card is partially open or cause the ink to crack.
Practical Advice: Use a dry-fit method. Assemble the card without glue first to check alignment. Use tweezers for small details like the poinsettia centers. When customizing colors, consider contrast. A dark door with a light wreath pops more than similar tones. Ensure your sentiment is placed on a flat, stable area of the card base, away from the moving parts of the door mechanism.
Overlooking the Envelope Compatibility
A major oversight occurs after the card is built. Crafters often spend hours perfecting the 3D door only to realize it does not fit in their chosen envelope. The description notes that the card fits great in a 5x7” envelope, but this assumes the card is folded correctly and the embellishments are not too bulky. Adding excessive adhesive or thick foam tape to the gifts or wreath can increase the profile beyond what a standard envelope can handle, leading to damaged mail or extra postage costs.
How to Avoid This: After assembling, press the card flat gently to ensure it settles into its 5x7” footprint. If you have added significant dimension to the exterior decorations, consider using a rigid mailer or a slightly larger envelope to protect the artwork during transit. Always test one completed card in the envelope before producing a batch for mailing.
Cutting Machine Settings and File Preparation
Whether you are using Cricut or Silhouette cutting machines, the settings must be tuned for precision. This Christmas Door Card - Christmas SVG contains small, intricate details such as the wreath leaves and gift bows. Using a dull blade or incorrect pressure settings can result in torn paper or incomplete cuts, which ruins the clean lines necessary for a professional look.
- Blade Check: Always inspect your fine-point blade before starting. Replace it if it has been used for more than a few projects.
- Mat Adhesion: Use a LightGrip mat for cardstock. A StandardGrip mat may be too sticky, tearing the paper upon removal, while a FabricGrip mat may not hold the small pieces securely.
- File Integrity: Before cutting, ungroup the SVG elements in your software to ensure no stray lines or hidden objects are included. This prevents wasted material and confusing cut paths.
Maximizing Creative Potential
While the provided design is complete, experienced crafters know that personalization elevates the project. Do not feel bound by the default color scheme. The ability to change the door color invites experimentation. Try metallic cardstocks for a luxurious feel, or patterned paper for a whimsical touch. However, maintain consistency. If the door is patterned, keep the wreath and gifts solid to avoid visual clutter.
Additionally, explore more card designs to expand your repertoire. Understanding the mechanics of this door card can help you tackle other 3D papercraft ideas. The skills learned here—precision folding, layer alignment, and structural balancing—are transferable to other holiday projects.
Final Checks Before Assembly
Before you commit to glue, perform a final evaluation. Check that all cut lines are clean. Ensure that the score lines are deep enough to facilitate easy folding but not so deep that they cut through the paper. Verify that the dimensions match the expected 7” height and 5” width when flat. If any piece seems off, recut it now rather than trying to force a mismatched component later.
Creating a fun card for Christmas with this design is rewarding, but satisfaction comes from attention to detail. By avoiding common mistakes in material choice, alignment, and mailing preparation, you ensure that your handmade card is not only beautiful but also durable and functional. This Christmas Door Card - Christmas SVG is a tool for creativity, but your careful execution is what turns it into a cherished keepsake.